Configure Payroc Cloud for an Android device
There are two ways to use Payroc Cloud to send instructions to an Android device:
- If you have an Android device with the Payroc App, but the POS system is on another device, go to Send instructions to a different device.
- If you have an Android device with both the Payroc App and the POS app on the same device, go to Send instructions to the same device.
Send instructions to a different device
You can send instructions to a payment device that is on a different network or at a different location than the POS, however the payment device must be connected to the internet.
How it works
The following diagram describes the flow of a transaction between the POS, our gateway, and the payment device.
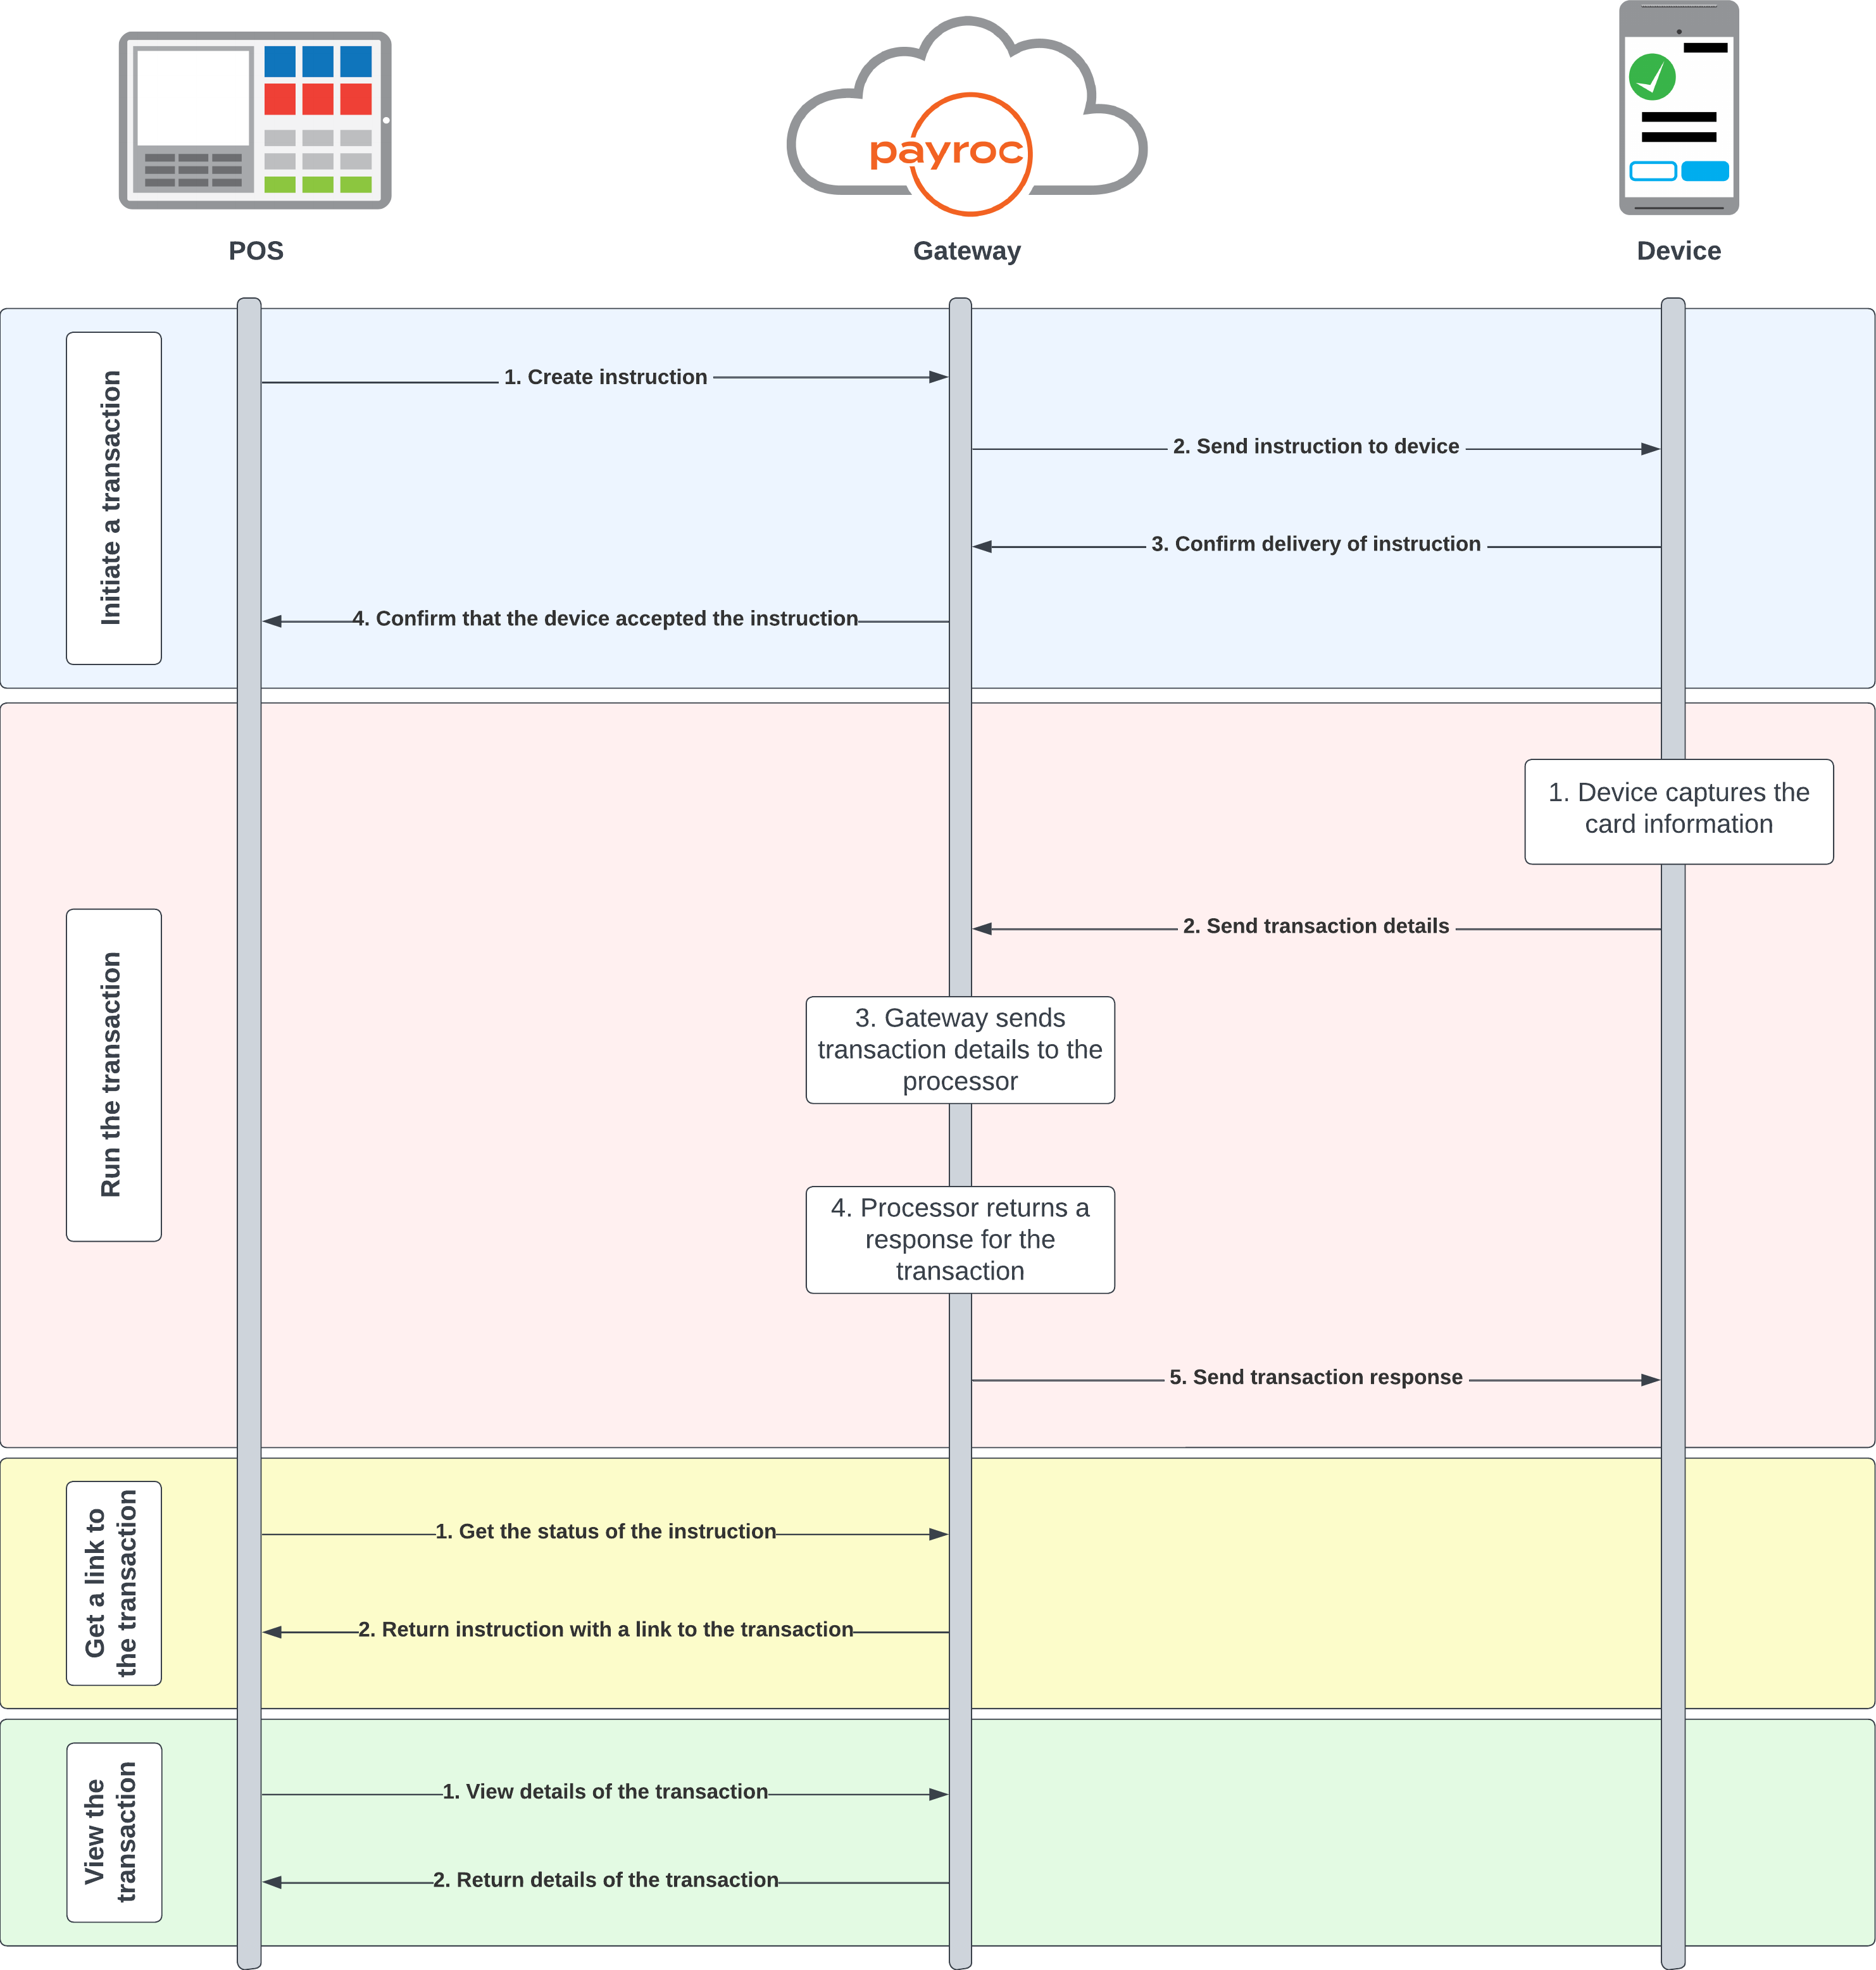
Initiate a transaction
- The POS sends an instruction to our gateway.
- Our gateway passes the instruction to the payment device.
- The payment device confirms that it has received the instruction.
- Our gateway sends a response to the POS that contains an identifier for the instruction.
Run the transaction
- The payment device captures the card details.
- The payment device sends the transaction details to our gateway.
- Our gateway sends the transaction details to the processor.
- The processor sends a response to our gateway.
- Our gateway sends the response to the payment device.
Get a link to the transaction
- The POS sends a request to our gateway to check the status of the instruction.
- Our gateway sends the response to your POS that contains a HATEOAS link to view the transaction.
View the transaction
- The POS sends a request to our gateway to view the details of the transaction.
- Our gateway sends a response to the POS that contains details about the transaction.
Guides
To integrate with our API so that you can send instructions to a payment device, go to our guides:
Send instructions to the same device
When you send an instruction to the payment device, the device uses the Payroc App to capture the card details. The Payroc App then sends the card details to our gateway with the transaction information.
If you use a POS app on the same device as the Payroc App, you need to switch between your POS app and the Payroc App after the following key events:
- When you receive a response to the instruction request.
- When you receive the details of the transaction.
- When the instruction is cancelled or fails.
How it works
The following diagram describes the flow of a transaction, between your POS app, our gateway, and the Payroc App.
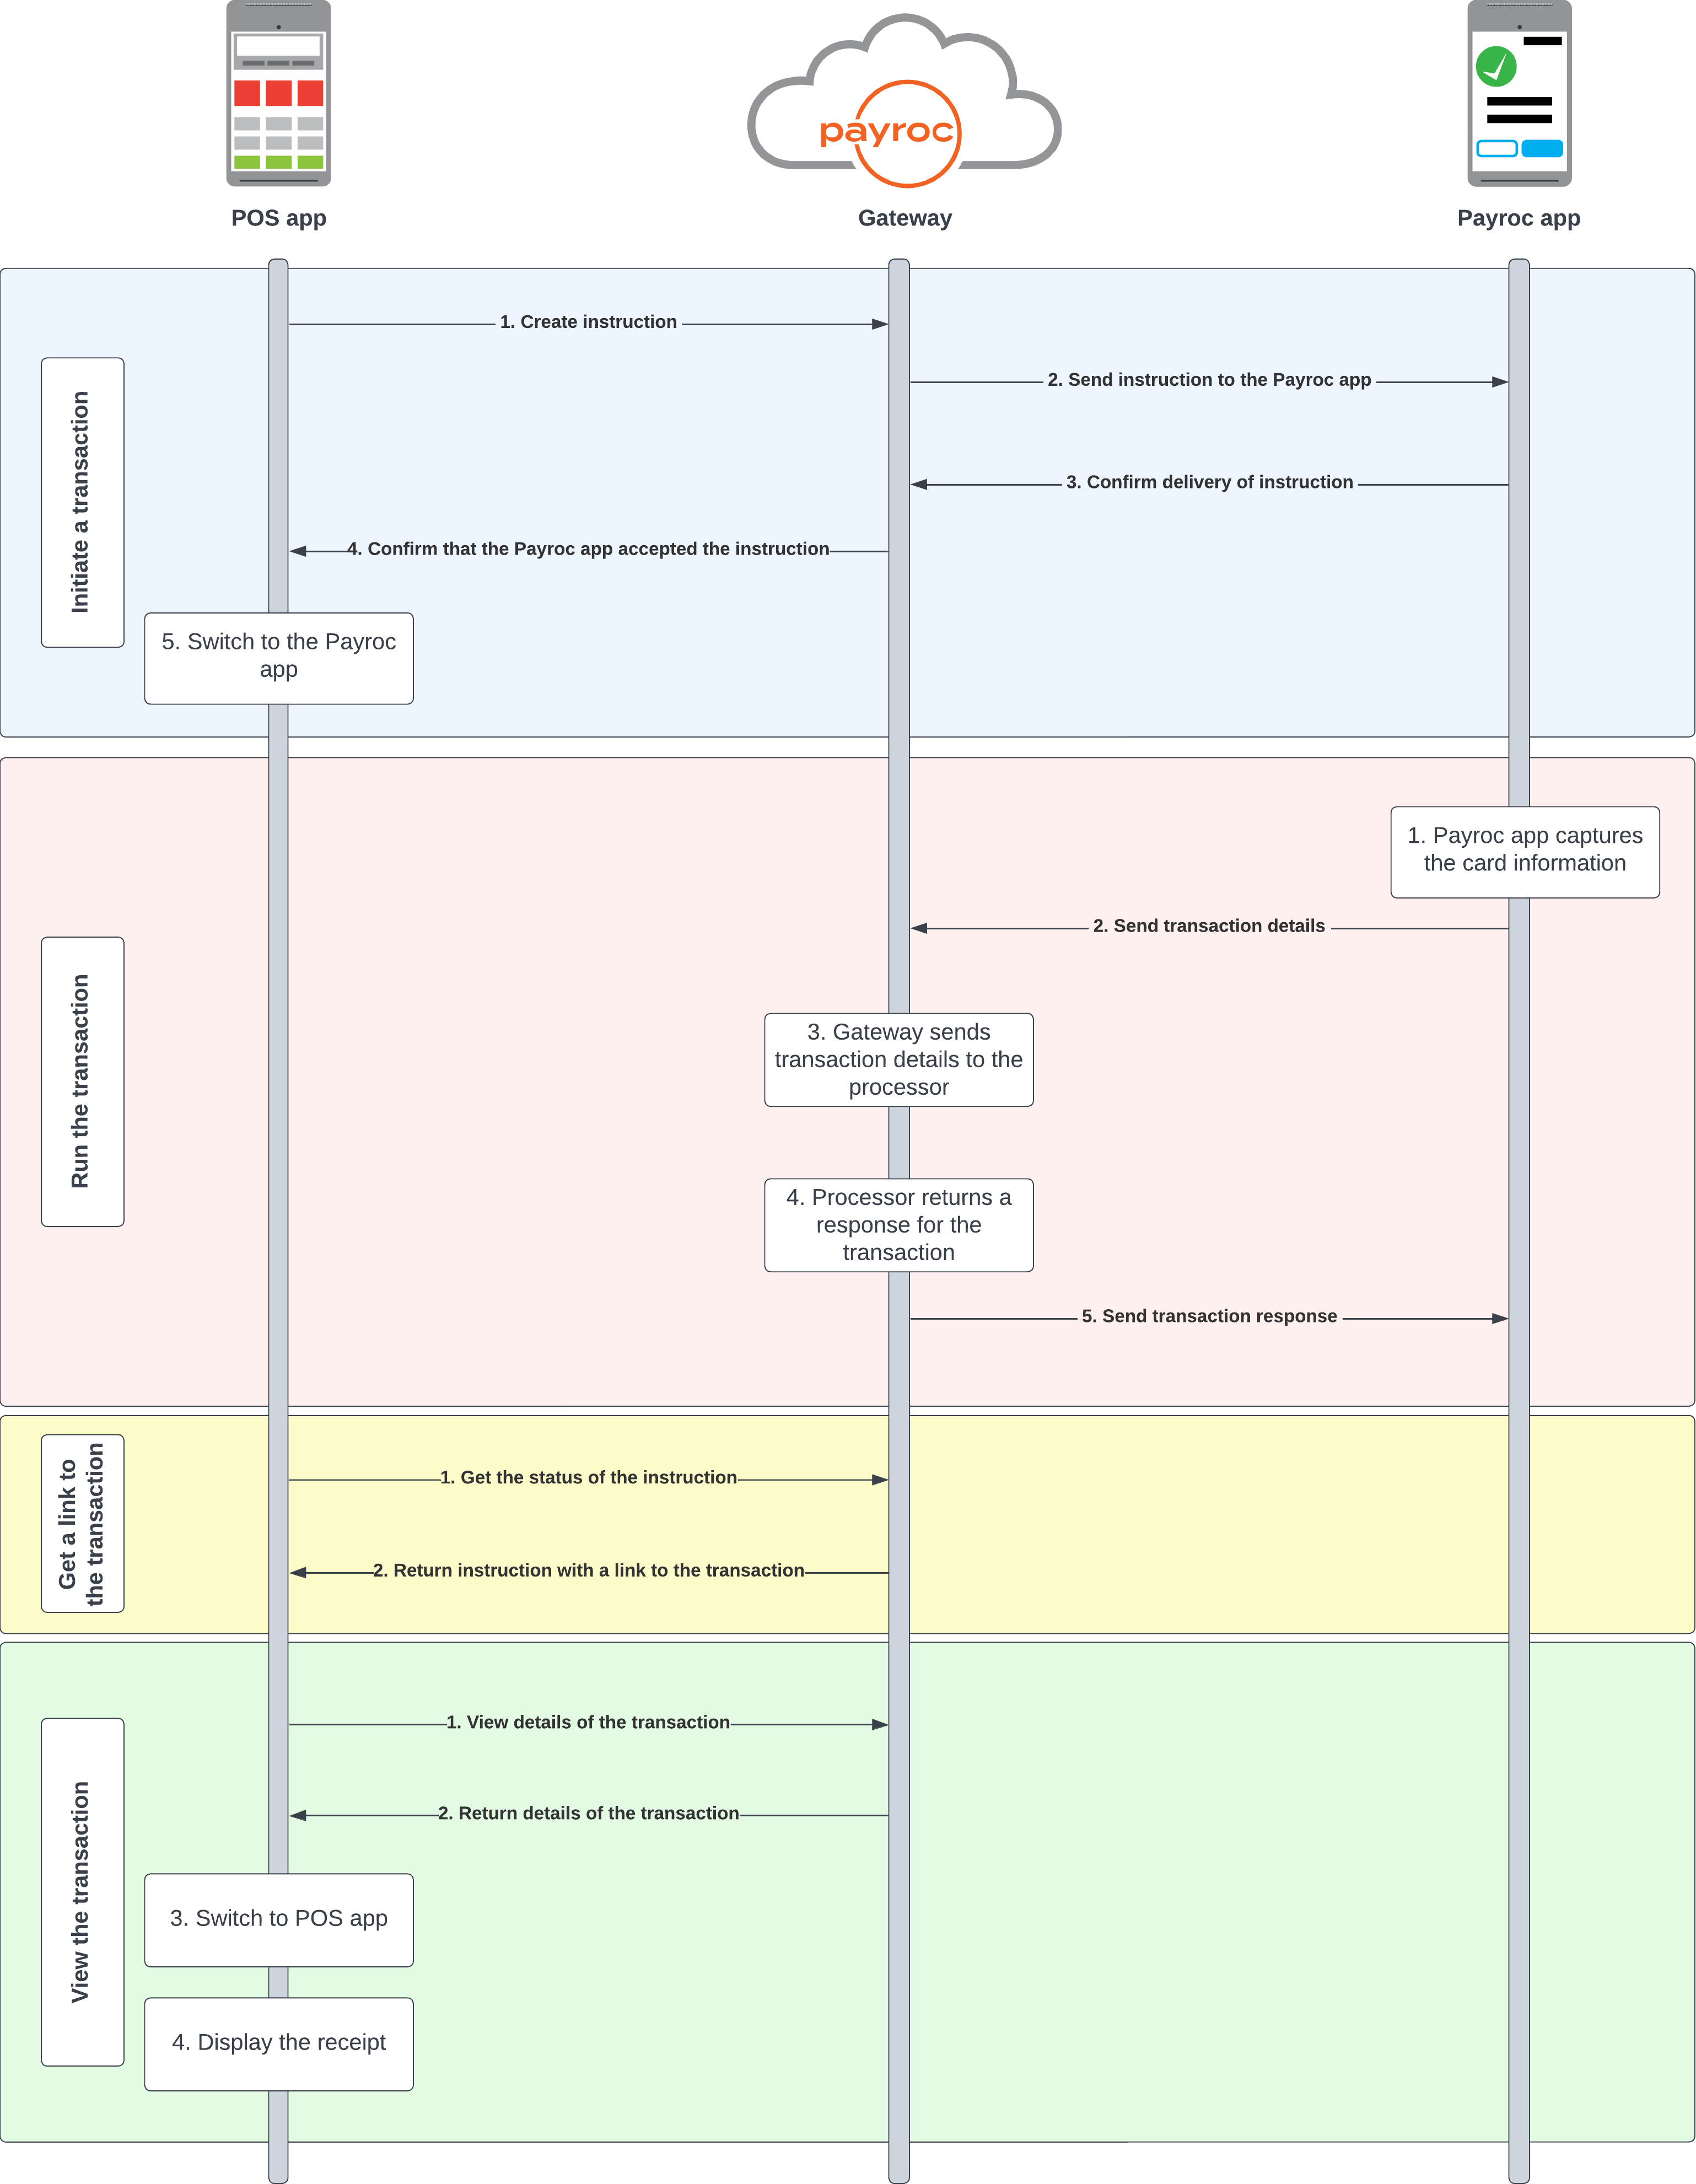
Initiate a transaction
- Your POS app sends an instruction to our gateway.
- Our gateway passes the instruction to the Payroc pp.
- The Payroc App confirms that it has received the instruction.
- Our gateway sends a response to your app that contains an identifier for the instruction.
- Switch to the Payroc App.
Run the transaction
- The Payroc App captures the card details.
- The Payroc App sends the transaction details to our gateway.
- Our gateway sends the transaction details to the processor.
- The processor sends a response to our gateway.
- Our gateway sends the response to the Payroc App.
Get a link to the transaction
- Your POS app sends a request to our gateway to check the status of the instruction.
- Our gateway sends the response to your POS app that contains a HATEOAS link to view the transaction.
View the transaction
- Your POS app sends a request to our gateway to view the details of the transaction.
- Our gateway sends a response to your POS app that contains details about the transaction.
- Switch to your POS app.
- Your POS app displays the receipt.
To run follow-on actions, for example, to void a sale or to view the details of a refund, use the methods in our Payroc API.
Before you begin
Before you integrate with Payroc Cloud, complete the following:
- Adjust permissions on the payment device.
- Update the Payroc App.
- Configure your activity to run a single task.
- (Optional) Set the Payroc App to start first.
Adjust permissions on the payment device
Note: This applies only to Android 10 devices.
To switch back to your POS app from the Payroc App, adjust the following permission in the manifest:
Example code
Update the Payroc App
To make sure that your Payroc App is up to date, open the Payroc App from the home screen. After you open the Payroc App from the home screen, the Payroc App fetches the latest version and settings.
Note: The Payroc App doesn’t display the navigation bar. To view the navigation bar, tap the Payroc logo three times.
Configure your activity to run a single task
To make sure that you return to the same activity instance when you switch back to your POS app, configure the launch mode to singleTask.
Example code
(Optional) Set the Payroc App to start first
If you want to start your POS app when the device turns on, you need to make sure that the Payroc App starts first. To make sure that the Payroc App starts first, set the priority of the intent filter in the boot receiver to 0.
Example code
What to do after you create your app
After you create your app, upload it to the Paxstore. When you’re ready to release your app, contact us and we’ll link it to our Payroc account on the Paxstore.
Guides
To integrate with our API so that you can send instructions to a payment device, go to our guides: